Tuesday, February 19, 2013

How To Boil an Egg

And I thought boiling an egg was simple! 
Today I used trial and error to complete the three types of boiled eggs. Soft. Medium. Hard. It was way more difficult than I had presumed it would be. Who would have thought that boiling an egg the correct way would be so difficult? Not me. Now I know.


My favorite trial was the medium boiled egg. It was so delicious… Who can actually say that they don't love the lusciously, velvety cream, that just erupts from an egg that has been medium-boiled to an absolute perfection? I bet it's safe to say most people have not even encountered this delicious experience.

There are many sites online that tell you the times in which to boil your eggs. I have discovered that not every site is correct or perhaps every experience may be slightly different.

I found that the best way to boil your eggs is by filling a pot with water only slightly above your eggs. Make sure eggs are covered. Check the eggs for any cracks before starting the boil. Do not add salt the water. You do not want the eggs floating in the water. Never layer the eggs in a pot.  

Place the eggs and with enough water to cover eggs, on the stove, on high heat. Boil until water reaches a rapid boil. Make sure it's at a rapid boil and then cover the pot tightly. Remove from heat.

For a soft boiled large egg, I kept the egg in the covered pot for 4 minutes, but time may vary from 3-5 minutes, depending on size of the egg. 


For a medium boiled large egg, I kept the egg in the covered pot for 6 minutes, but time may vary from 5-7 minutes.


For a hard boiled large egg, I kept the egg in the covered pot for about 11 minutes, but time may vary between 10-12 minutes.  


If you are making hard boiled eggs for the intention of creating deviled eggs, there is a great tip to use. The night before making the eggs, tilt the carton of eggs on it's side. This centers the egg yolk for a more preferable deviled egg result.

My most difficult was positively the soft boiled egg. Having failed many soft boiled eggs because I mistakenly did not let the water come to a rapid boil. Had to fry up the uncooked eggs for my son after I broke them open. 


Monday, February 18, 2013

my food aspirations...

I would just like to state that I have tons of recipes I want to share but I only review and share recipes as I re-create them. They are original and are always created to fulfill my taste in foods.


I sometimes start to follow directions from recipes to create the initial presumed result, but I never copy a recipe. Alteration and perfection is my key. If anyone ever has a better result or recipe, I always encourage their comment for the bettering of taste management for myself and others. Cooking is but only a learning experience yet to be perfected by all, and not quite tasted by many. 

Sweet & Savory Salmon

Sweet & Savory Salmon
An avid viewer of my blog has asked for a salmon recipe from me. Here, I share my favorite salmon recipe which includes both sweet and savory ingredients that blend with such harmony. 
Ingredients:
Alaskan Salmon Fillet (at $6.99/lb.) 
about 3-4 heaping tablespoons of butter
about 2 handfuls of brown sugar

I bought 0.82 pounds of salmon and spent only $5.73 for an amazing beautifully pink slab of salmon. 
This recipe is simple in that you mainly have to combine all the ingredients and fry to perfection. Note: the more brown sugar you use, the more sweet of a flavor you will encounter. I love using a decent amount of butter and only enough brown sugar to create a semi-thick sauce with the salmon. It captures the essence of the fish and accents it's rich flavors in such a magnificent way! Salmon really is the best of the fishes to work with and eat. And it's even the best in sushi!

Goes god with potatoes and gravy or some kind of buttered vegetable. 

Hollandaise Sauce

Hollandaise Sauce  over Asparagus
"Day one. 364 days to go. I cooked artichokes with Hollandaise Sauce, which is melted butter that's been whipped into a frenzy with egg yolks until it died and gone to heaven. And let me say this. Is there anything better than butter? Think it over. Every time you taste something that's delicious beyond imagining, and you say, "what is in this?" The answer is always going to be "butter." is a quote recited from the actress Amy Adams, playing as Julie in the 2009 film, Julie & Julia. 

This recipe I only attempted after watching the movie that inspired the making of my blog, Julie & Julia. Although I am extremely gluten & dairy-intolerant, I made this one for my husband and son. 

It's a way more simpler dish than I expected it to be. Although some may have to add extra egg yolks if it becomes curdled, it's not as difficult as imagined. I ultimately went by all the recipes online and had to add an extra egg yolk to avoid curdling. 

I have seen this dish on such shows as Master Chef and figured that it was a sophisticated and complicated recipe to create. This is not the truth... at all. And I even recommend it for anyone who loves BUTTER and wants to try something new on their breakfast or vegetables! 

When telling my mother what I made the family for lunch, she responded with a skepticism about what it even was. I think everyone sort of views this recipe as a more "snobbish" or "crowd-pleasing" sauce that only rich people eat. This should not be the case, EVER! It's actually quite a cheap and relatively simple recipe. Only using egg yolks, lemon juice and seasoning, this at least, should be a recipe to try!

(used a lot of butter when frying and then baking the asparagus)

Ingredients:
4-5 egg yolks (used 5 egg yolks)
juice from half of a lemon
1/2 cup melted butter (or 1 stick)
cayenne pepper; about 1 small teaspoon
pinch of salt

Separate the egg yolks from the egg whites. Set aside egg yolks. To not be wasteful, you can save the egg whites for fried eggs on toast or as you please...

In a stainless steel bowl, whisk the egg yolks and fresh lemon juice until the mixture becomes thicker in consistency. 

Boil water in a frying pan. Place the thick lemony-yolk mixture above the boiling water and whisk rapidly. (Make sure the stainless steel bowl does not touch the boiled water. You can use a double boiler instead as well. Make sure the eggs do not cook through!) Then add the melted butter while continuing to whisk. Also, add in cayenne and salt. Remove from heat. Add over your desirable foods. Some smother the rich, ambrosial Hollandaise sauce over...
... cooked asparagus
... cooked artichokes
... cooked brussel sprouts
... eggs benedict
... (and I have even read is amazing over) grilled fish...
... and many more... 

ENJOY!

Non-Traditional Pork Pot Pie: Substitute with Chicken or Turkey


Tonight I made a pot pie with ingredients that were sitting in my cabinets and refrigerator. 
That being said, I used pork chops instead of the traditional chicken or turkey one uses. I then fried it and cut it into cubes. And to tell you the truth, it's just as delicious with pork as it is with chicken or turkey. I am a person who loves pot pies and loves how versatile the recipe can be.  There should never be a recipe set for a pot pie. Using my skill for making cheap but delicious meals, I usually use whatever I have on-hand. So far, I have never failed in the pot pie department... but have had many fails for other recipes. That's the fun in cooking! It's all experimental. Kind of like high school science classes when you use the trial and error method... I don't know why I thought of that (haha), but I know I'm not alone... or at least hope not. 

Filling Ingredients:
2/3 cup frozen peas
1 cup frozen corn
1  1/2 - 2 cups potatoes; peeled and cubed
1 (10  3/4 oz.) can of Campbell's Condensed Soup Broccoli Cheese
1 can green beans
1/4 cup milk
2-3 tbs. softened butter
about 2 cups chicken, pork, or turkey; cooked and cubed
McCormick Steak or Hamburger Seasoning; to taste
Cumin; to taste
salt and pepper, to taste
Pot Pie Topping Ingredients:
2 eggs
2 cups Jiffy Mix
1 cup milk

To start, I cut up the potatoes into cubes and fry the pork chops until fully cooked. Boil the potatoes until they are softened and can easily be sliced by a knife, without force. Dice up the pork chops and cut off any fat.


Place the frozen peas and frozen corn in a microwave-safe bowl and add some water or butter. Microwave on high for about 45 seconds to one minute. Drain water.

Mix together 2 eggs, 2 cups Jiffy mix, 1 cup milk and salt and pepper (to taste) in a large mixing bowl. Combine thoroughly with a whisk. Mix until the doughy mixture no longer contains any lumps of the dry Jiffy mix; for about 3-5 minutes. 

In a 13" x 9" glass pan (or something around that size) you want to add the following ingredients... (you can either mix them in a separate large mixing bowl or in the pan. I'd rather use less dishes and mix it in the bottom of the glass pan I'm using to bake it in). -the can of broccoli cheese soup, cubed pork, can of (rinsed + drained) string beans, 1/4 cup milk, 2-3 tbs. softened butter, the warmed up peas and corn and the boiled cubes of potatoes. Mix well. Add desired seasonings.


Then fully cover the mixed vegetables and meat with the Jiffy mixture. Bake at 350 degrees for 25-30 minutes. Check the crust with a toothpick to make sure the topping is fully cooked and not raw. Enjoy!

Tips:
You can make pot pies with almost anything. It's so extremely versatile! One time I used cream, milk, and butter in the vegetable mixture because I didn't have any cans of cream of soup (such as cream of mushroom, cheese, or chicken soups) available. Another time I used the cheese powder packet from a macaroni and cheese box, and then added milk and butter, to taste. 
You can also use any frozen, canned or (boiled/steamed) fresh vegetables for any pot pie. 
Everyone seems to prefer turkey or chicken for a meat, but pork works just as well. 
Instead of Jiffy, one can use Bisquick instead. I actually really loved using Jiffy because it seemed to maintain a sort of sweet and savory crust! I loved the mixture of the semi-sweet crust with the indulgent innards. 
Hope You All Enjoy! Share any extra tips in the COMMENTS below if you desire to share with others any other ways you love your pot pies!!! Thanks!

Happy Valentine's Day All!

So for Valentine's Day this year, my husband lovingly got me the one thing I really wanted! 

After I asked him for it, days before Feb. 14th, he questioned me as to whether I read his list of things he wanted to get me... I of course, had no clue he even knew I wanted it! 

After a day of searching everywhere for it, he finally found me one at Bed, Bath & Beyond. Who would have known? 

What we didn't know was that the piece for making ravioli is excluded and a part you have to buy separately so I will have to wait for that piece but making my own pasta should be a fun experience. 

And as a tradition brought on by my dad, every Valentine's Day, I received my Valentine's heart. Not filled with chocolate, but rather Beef Jerky!!!  My all time Favorite thing to eat!!! 

Totally finished the beef jerky in one sitting!!! So yummy! And yes, as usual, this delicious beef jerky can be purchased at Super Wal-Mart from the cheaper Great Value brand. 

Wednesday, February 13, 2013

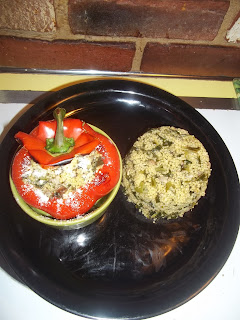
Bell Peppers Stuffed with Fresh Mushrooms, Couscous & Collard Greens


Let me start this entry by saying that I created this recipe purely from what I had hiding out in my freezer, cabinets and in my refrigerator. I usually try to make most of my dinners from what's laying around the kitchen. This is a great way to save on grocery costs. I usually buy a few bags of random frozen vegetables, when they are on sale, in the best efforts to possibly fortify a recipe that may later lack a vegetable.


This meal can be made for about 4 to 5 people depending on how many peppers you choose to buy. I bought two because they aren't in season right now and are a little pricey, but there is enough of the couscous and collard greens mixture to fill at least 4 medium-large peppers. This meal cost me about $8 to make. The costs may vary depending on what you already have in your own kitchen cabinets and fridge, and could be more or less than $8 to make.

Ingredients: 
4-5 medium-large sized peppers     $1.78 each     (buy accordingly to family members or guests)
Couscous:
1  1/4 cup water (according to box) 
tablespoon of butter, olive oil or salt
1 box Near East Couscous   $1.68     includes a 'Spice Sack'
Collard Greens:
2/3 (16 oz.) frozen bag of Pict Sweet Chopped Collard Greens, thawed     $1.28
Country Crock Bucket of Butter; can substitute olive oil or can use as little or as much as you prefer
2-3 medium sized whole Bella Mushrooms, diced into small pieces     entire container $1.98
1 cup Vegetable or Chicken Stock
2-3 tbs. Celery Salt
2 Cloves of Garlic, diced     Box for $0.68
about 4 tbs. olive or vegetable oil
Parmesan Grated Cheese
(all ingredients purchased were through Super Wal-Mart; prices vary according to state - these prices are based on the Lisbon, CT 24/7 Super-Walmart)


In a deep frying pan, cook 4 tbs of olive oil on medium-high heat until sizzling (sizzles if u add a drop of water).  Next, add the chopped garlic cloves and fry until slightly golden brown. Add 2/3 (or more) of a 16 ounce bag to the beautiful golden chunks of garlic and then add the desired amount of butter you wish to use. (For a healthier meal you can skip the butter and just use 1 cup of vegetable of chicken stock with seasonings.) 

I love using a lot of butter! It makes a sort of distinguished creamy texture in all foods and exudes abundant flavors that'll make your taste buds burst!!! The Collard Greens miraculously seem to just soak up the savory flavor of the pan-seared garlic morsels and salty butter, which creates a balance of complete perfection. 


I used over 6 heaping tablespoons of Country Crock's Calcium-Enriched Butter, at least 1 cup of my own Homemade Chicken Stock, and 2 or more finely chopped mushrooms. Cook the Collard Greens, mushrooms (finely chopped), garlic, butter, chicken or vegetable stock, and celery salt on medium-high heat for about 15 to 20 minutes until collard greens are tender. Stir occasionally and keep covered. Add more butter if desired; to taste. 

Meanwhile, cook the box of couscous in a separate deep frying pan and follow the directions on the back of the box. When the collard greens mixture is complete, combine the two together. Mix well.


Wash and then cut into the tops of the Bell Peppers as if you were going to carve a pumpkin. Cut at an angle, facing the knife down and towards the center, so that it can displace the hole in the top, without falling in. Wash the insides of the peppers. Then remove and discard any excess linings or seeds.


Set the oven to 400 degrees. Place the peppers onto a baking sheet and cook for about 15 minutes. I placed them into two small oven-safe dishes which sat atop a baking sheet. And to get a more charred look and a crispier outer wall of the peppers, I rotated the pepper onto each of it's sides, on the already-hot baking sheet. When charring sides, keep each side on the hot pan for about 1-2 minutes. This sears the sides slightly and makes the dish look a little more complex! 


After about 15 to 20 minutes, take the peppers out of the oven and begin to fill them with the collard green and couscous mixture. Top with desired amount of grated Parmesan cheese. 


Bake on 350 degrees for about 5 to 10 more minutes and then Enjoy!
--------------------------------------------------------------------------------------------------------------------------
This recipe was actually really amazing and probably shocked me the most with it's easy-to-achieve, beautiful appearance. Knowing nothing about collard greens and couscous, and never having even tried either prior to this recipe, I was hoping that the combination of the two would combine well. Not having much vegetables to choose from, I decided I'd be as resourceful and cheap as possible. 

This recipe was a complete success and I recommend it to anyone! As I mentioned throughout the cooking steps, this can be either a healthy meal (or side dish) or it can be a heavenly experience, seduced by the rich sensations that butter possesses!!! Your choice... I choose delicious fattening butter over less calories any day.

Tuesday, February 12, 2013

Gordon Ramsay: my inspiration

As a hard-ass, determined, and confident person, Gordon Ramsay has, hands down, become the most inspirational person to me, that I have never met. Meeting him would ultimately bring me to tears. 


(picture shown on website: http://www.rickey.org/hotel-hell-season-1-episode-3-recap-cambridge-hotel/ - from "Hotel Hell - Season 1 Episode 3 - Recap - Cambridge Hotel" written by Amy Hyun on Tue August 21, 2012 at 04:00 am)

Watching all of the shows he creates, has made me come to realize just how amazing of a person he really is. Beyond that hard exterior he exudes, he is probably the most caring and giving individual, on television, today.

 Yesterday, I started watching a show he stars in that is almost identical to Kitchen Nightmares. In Hotel Hell, he critiques and helps hotel owners, who are battling with debt, terrible food and bad hotel management, and works with them to create a better atmosphere and way of running things, that will ultimately save the owners from losing it all. 

About 10 minutes ago, I watched the third episode depicting the state of the Cambridge Hotel, in Cambridge NY, and was brought to tears by the ending. My three year old son was saying, "why are you crying?" in his jumbled 3-year old way of speaking. So cute... but in the end of that episode, Gordon Ramsay transforms not only the owner into being able to trust his staff and lose the military-mind set he has thrived from his entire life, but also changed the hotel's entire decor into a more accepting and hospitable place. 

Along with providing the hotel with over $75,000 worth of better linen within the rooms, he approached the kitchen where a main chef and student chef worked and so humbly offered the student chef his email. Scooter, a 19-year old who has battled two heart and back surgeries, explains to Ramsay that he was inspired to cook because he could not do such things like sports, because of  his disabilities. With this knowledge, Ramsay, the hospitable man he is, offers to pay Scooter's entire tuition costs, in hope that he can further fulfill his dreams of owning his own bakery. Watching this, made me automatically tear up. Just note, that I am not usually one to cry, but I am a sucker for such amazing moments like those. The moments you see on television that are so truly life-changing to someone, and you as the audience, are able to witness the emotion in their eyes. See how truly happy and thankful they are. Watching Scooter hold back his tears in absolute disbelief and extreme happiness, is one of those moments that I live to see. 

Gordon Ramsay is my inspiration. His hospitable character and the confident, strong way he carries himself, guides me and pushes me to strive for those things in life that I crave so desperately to achieve. 

Sunday, February 10, 2013

Feedback & a little insightful thinking...

Last night before I could even consider trying to fall asleep, I felt compelled to write. After scrutinizing over a blog that I will be soon posting (a How-To piece), I figured I would let my eyes get a little rest with the movie that has inspired the creation of this blog. Although I feel completely in the dark about blogging and how to appeal to readers to create a following, I will continue to write to those who may be listening. Is there anyone out in the blogosphere who considers my blogs a resourceful and compelling source?
< random older picture of the most delicious mussel stew my husband and I made together! :) >

Hoping my posts are not getting lost somewhere in the unknown, I will continue my efforts in aiding anyone who wants to read about my trial and errors and success stories, regarding my experiences in the kitchen.

As a new blogger I hope to inspire others to become more innovative in the kitchen and to also simply help those who repeatedly create the same menus for their family, week after week. Routine menus are pretty common in most households and I offer you my blog in hopes that you don't fall prey to a repetitive menu...

I am 100% open to feedback, criticisms, and any alterations to my recipes that will ultimately make the recipe better. Although positive ones are always preferred, I know constructive criticisms can be just as amazing. Feedback shows me that people are reading my blog and using my ideas freely. This is one of my missions or intentions I wish to achieve. That being said, people who would like me to blog about a specific dish (write about a favorite childhood recipe per-say...), want me to create and then blog about one their own recipes, or want me to create a food trial and error (like my How To Boil An Egg segment) OR TO EVEN create an informative specific How-To piece that they would find helpful, IS highly encouraged TO DO SO!!! 

What appeals to you, my readers? 

I'm initially here for YOU! I do want to learn and master stuff for my own benefits, but this blog is written and intended to help anyone willing to follow or read what I put out. 

Being on a weekly budget, I am confined to a strict spending limit that entails me to either bargain shop or slowly buy ingredients to an expensive recipe . This limitation is what instigated my title of "Cooking on a Budget & Tips."  Someone such as the fictional character Julie (2009 film, Julie & Julia), may have the luxury of cooking lobster one night and duck the next (depending on the recipes presented throughout the Julia Child cookbook, which depicts a character who thrives to challengingly reawaken and expose Julia Child's recipes to the new world of blogging, by dissecting and patiently following each one of her recipes in the book), but I am neither fictional nor  well-endowed.

I am but only the typical at-home mother and wife, who was inspired to blog after watching an incredible movie and ultimately thinking and dreaming about cooking and food, probably way too much... I always loved watching my father (Mark Ryan of Blackstone, MA) cook. He never used measuring tools and he always used the tactic of taste, taste, taste. He had an impeccable pallet and could always invent the most unique, yet scrumptious meals. Precise measurements were not optional. Our favorite meals almost always included at least one red meat, lots of garlic, a ton of butter, and seasonings to taste (preferably McCormick brands).
Plus, he was the best at finding the most fresh, delicious steaks for cheapest local prices. Alike to myself, he also was a bargain food shopper; but always to an extent. Some things do demand that you do not buy the cheapest brands. 

I use multiple grocery stores to purchase the cheapest, but best quality foods. Recently, I have been pretty happy with my shopping experience at a local Norwich, CT grocery store, Starr Wood Grocery. I go there for my meat and fish purchases. And of course, Super Wal-Mart fills all of my other needs! 

My recipes are definitely versatile in that they are sometimes limited with only ingredients that I have on-hand. My blog can be used as sort of a food Bible or a place to grab tips or recipes. And...  ... they are almost always either simple recipes or they contain ingredients that are very commonly used.

I mean think about it. How many cookbooks have you gone through until you finally found that one that you fell in love with? If you're like me, then I bet you found one that essentially excluded those pesky unknown ingredients, that forced you have to google search it, in order for you to find out what it even was? I mean face it, Rachel Ray has the kitchen for a God or Goddess! A lot of her ingredients and the utensils she uses, are not common in most or probably even many households. And I know that I prefer my cookbooks to not have to come with it's own Webster Dictionary. Nor do I believe that anyone should have to make unnecessary trips to the computer, for a google translation, and a description of where it can be found, do you?

Friday, February 8, 2013

Open-Faced Grilled Portabella Sandwich

After talking with a few friends, mainly through my Facebook, I received some feedback about what some people may like to see more of in my upcoming blogs. A close friend, one knowing my desire to consume and almost always have to cook with meat, brought forth the idea of my trying a week of all vegetarian dishes. Yup. That would mean a week where I don't buy or even eat a delicious, mouth-watering steak; that would undoubtedly be cooked to medium-rare and then smothered in mushrooms and sided by A1 Sauce and my infamous Garlic Roasted Mashed Potatoes! I am totally drooling at the thought now. This fantasy needs to stop.

Well anyways, I figured I would try to take him on but maybe for a more reasonable amount of time like 3, maybe 4 days. Another friend of mine also suggested I present a few more healthier dishes. Hearing these two similar ideas, I felt inspired to take up their requests by attempting at least 3-4 days of nothing but healthier vegetarian dishes.  I can't say I'll be completely successful in the complete avoidance of meat, but I'm willing to try and blog about it, for YOU, my readers!


All ingredients listed below are bought at a Super Wal-Mart in Connecticut. Although this isn't the cheapest of meals, it is definitely a healthier one. The substitution of a Portabella mushroom over a greasy burger is actually a quite savory and delectable choice. Creating two of these yummy open-faced sandwiches ran me about $14. Remember though, most kitchens should have most or some of the ingredients below that I may not have had in stock in mine. Some of those things you should always have are the balsamic vinegar, sun-dried tomatoes, olive oil and almost any type of cheese on-hand would probably do the trick.

Ingredients:
Giorgio D'Lightful Portabella Caps (6 oz.)     $2.94
Red Bell Pepper                                                        $1.78 
          (1/2  pepper; sliced)
Great Value shredded mozzarella, Great Value Ricotta Cheese or some other desired cheese  
          (about $2.28 a 2 cup bag of shredded or $1.94 for ricotta)
Mezetta Sun-Ripened Dried Tomatoes           $3.42 
          (only used about 1/8th of the jar)
Asparagus, if desired to top with
          (costs about $2.98/lb.)
Colavita Balsamic Vinegar                                   $3.44 
          (about 3-5 tablespoons)
5-10 tablespoons olive oil
Marketside Italian Loaf                                        $1.68
          (about 2 slices; brushed in olive oil and then baked)

Firstly, I turned the oven on to broil and threw some aluminum foil on half of my broiler pan. 

Next, I started on my Portabellas by extracting the stems and then washing them out thoroughly. Using paper towels, I placed them, stem-side down to drain any excess water. 

In a medium-sized bowl, combine about 2-4 tablespoons balsamic vinegar and approximately 5-8 tablespoons olive oil. If you like balsamic vinegar, add 4+ tablespoons and dilute with some extra olive oil. Mix them well. If you prefer, add some salt and pepper, to taste to the balsamic-oil mixture. Cut the bell pepper in half, discarding the seeds, and then slice one half  into long, thin strips. 

Using a food brush, lather on a few tablespoons of plain olive oil to both sides of the two slabs of Italian bread. Bake for about 2 minutes and then flip and bake for another 2-3 minutes, or until golden brown and crispy. 

Lay the dried mushroom caps, bell pepper strips, and the asparagus tips (if using) on the broiler pan. I placed the mushroom caps on the aluminum foil and the bell peppers across the tall ridges along the pan. Using the brush, evenly coat both sides of the vegetables with the balsamic-oil mixture.

Set the broiler pan into the preheated oven and bake for about 10-15 minutes. Keep an eye on them and flip them midway through. 

On the warm Italian bread slices, cover the top with the desired type and amount of cheese. I used about 3 tablespoons of Great Value Original Ricotta Cheese and a small handful of Great Value Shredded Mozzarella Cheese. I then scooped up half of the broiled bell pepper strips and generously slathered that over the top. The warmth should slightly melt the cheese to that perfect medium. Add a few of the sun-dried tomatoes still saturated in it's juices, then top with the seasoned Portabella. If you are using the asparagus as well, add this vegetable atop the mushroom. 
This is an extremely delicious recipe that I cooked for my husband and a friend of ours!!!  They both devoured the open-faced sandwich creation in minutes, licking their chops in complete delight!  
Hope you Enjoy as well!  

Monday, February 4, 2013

Baked Pasta & Mushroom Sauce Topped with Cheese

Does your child love pasta and sauce and CHEESE as much as mine does? Well here is one way to combine the two and an easy and cheap lunch of about $6!


Baked Pasta & Mushroom Sauce Topped with Cheese
Fiori Pasta          $1.28
Cheese slices      $2
          (maybe 8-10 slices)
Pennsylvania Dutchman Mushrooms
                             $1.36
G.V. Italian Garden Pasta Sauce
                            $1.30
This recipe is simple and just a new way of eating your pasta with the family!

Cook 1/2-1 whole box of pasta until al dente. Add salt and pepper or olive oil to the boiling water. Drain the water and place the cooked pasta into a baking dish. Cover in sauce, mushrooms, and cheese as desired. Place the baking dish in the oven at around 400 degrees F until cheese is crispy and melted through. My son devoured this lunch up today and enjoyed the shape of the Fiori pasta. Although he isn't a fan of the mushrooms, I baked only half of the pasta with a bountiful amount for me. 


Beef Tacos & Chicken Fajitas

I love making tacos for the family and my husband loves his fajitas, so I figured I'd combine the two for a delicious night of Mexican! It only cost me about $13 to create the two large meals!!! Enjoy!


Beef Tacos:
GV Diced Tomatoes              $0.68
1 lb. Hamburger 80/20           $3
1/2 bag of Shredded Cheese  $2.28
Chicken Fajitas:
Boneless Chicken Breast        $2  ($1.99/lb)
1 Green Pepper, sliced           $0.53
1/4 Onion, sliced                    $1
Ortega Fajita Dinner Kit         $2.39
2-4 servings Instant Rice
Cumin, to taste
Salt & pepper, to taste
2 scoops butter or olive oil
Taco seasoning:
Garlic Powder                       Oregano
Onion Powder                      Cumin
Paprika                                Celery Salt
Pepper                                 Chili Powder
Italian Seasoning      

To start, cook the hamburger meat on medium-high heat in a large frying pan. When cooked through, drain the grease and discard. Return the cooked meat into the pan and add 1 cup water and as much of the taco seasonings as needed. Taste, taste, taste is what I do! Turn the stove to low heat. I do like to add more of the cumin, celery salt and garlic powder for my preferences on taco seasonings. Keep an eye on the sauce and meat and always keep enough sauce in the pan, to avoid overcooking the meat.


Cut the boneless chicken breast into slices. Place the chicken strips into another larger frying pan and cook until cooked through. Next, add some oil, water, and the packet of Fajita seasonings (in the Ortega Fajita Dinner Kit) and simmer in juices while keeping some Fajita juices.

-- my son's Chicken Fajita opened --

Cook the rice according to the box directions.

Open the can of diced tomatoes and drain. Place in small bowl. Unless you use fresh tomatoes; which I highly prefer, but did not have on hand. Fresh tomatoes are completely ideal!!! 

Make your tacos as you desire them to be! Mine I stuff with cheese and then topple with meat (so the meat cooks the cheese) and then top with condiments. If you keep the Taco Bell packets of Fire, Hot or Mild Sauces; LOAD a couple of them bad boys on top and Enjoy! 


Sunday, February 3, 2013

Chicken Sherry Marsala

My favorite recipe to create and consume is my infamous Chicken Marsala. This is my first time of completely substituting Sherry Cooking Wine with Marsala Cooking Wine, and I completely love it! I use the  brand Holland House that can be purchased at most Grocery Stores, including Super Wal-Mart. This meal should usually run you about $10, $15 maximum, depending on what you have around the house.


Chicken Sherry Marsala
Box of 2 Garlic Cloves (from Super Wal-Mart);         -  $0.68
     about 5-6 cloves, chopped and diced
Great Value Heavy Whipping Cream; about 1/2 cup  -  $1.78
8 oz. Sliced & Clean Mushrooms                              -  $1.98
Boneless Chicken Breast at 1.99/lb.                          -  $1.99
Rolland House Sherry Cooking Wine                        -  $2.62
3 Eggs
1/2 pound thin spaghetti
About 1 cup of Flour
Olive Oil
Celery Salt
Ground Black Pepper
Garlic Powder
Italian Seasoning
Basil


In a deepened plate or a bowl, add 3 eggs with the seasoning of your choice. I used celery salt, ground black pepper, basil, Italian seasoning, and garlic powder.  Whisk together to blend.


In a similar bowl, place about one cup of flour for dredging the chicken into firstly.


Now slice the chicken breasts into a slender stripping, lengthwise. Once sliced, place wedges under wax paper (or plastic wrap if wax paper is not available), and use a cooking mallet (or something as equally resourceful) to pound out the chicken to a thinner cut. 

In a large pot, boil some water. Boil enough that will cook your family a meal of pasta. Add vegetable oil and/or salt and pepper to the water. Once boiled, add the desirable amount of spaghetti and cook until al dente.


After you completely cover the pounded breast in the flour, you want to then smother it in the seasoned egg juices. To ensure that the chicken will have it's miraculous coating, I then dredge it straight back into the flour for one last time. Coat it well and with an abundant prosperity. Then cook on medium-high heat in a deepened pan. Cook until the mushrooms, chopped garlic, and slices of chicken are fully saturated with the olive oil (or vegetable oil), heavy whipping cream, Sherry Cooking Wine, and natural juices that are purged. 


In a large deepened plate or bowl, join the mushroom-garlic-chicken mixture with the cooked spaghetti and serve. Enjoy!

Make sure to comment or add any critiques about any additional ingredients you would like to share with others!!!